Groups provide administrators with a highly flexible way to organize users, assign tasks, and manage security awareness training. This guide covers the differences between Groups and Departments, how to manage custom groups, and how to utilize the automated "Phished Users" group.
Departments vs. Groups
While both features help you organize your users, they serve distinct operational purposes:
| Feature | Departments | Groups |
| Purpose | Mirrors your organization's internal hierarchy (e.g., Marketing, Sales, Finance). | Segments users based on custom criteria (e.g., language, geographic location, or risk level). |
| Management | Can be automatically synced with Single Sign-On (SSO) systems. | Dynamically populated or manually adjusted at an administrator's discretion. |
The "Phished Users" Dynamic Group
Wizer automatically creates a specialized Phished Users group to capture users who fail simulation campaigns. Because this group is automated and includes specific remediation workflows (like assigning follow-up training), we have a dedicated guide for it.
→ How to Manage the "Phished Users" Group
Group Management Operations
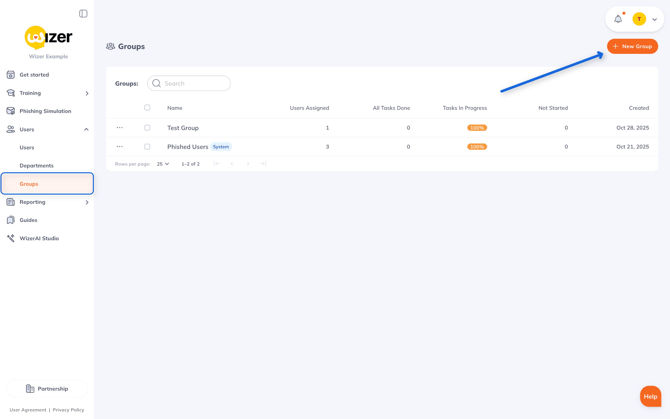
Creating a New Group
-
Navigate to the left sidebar menu and select Users.
-
Click on Groups.
-
Click the New Group button.
-
Enter your desired group name and click Create Group to save your changes.
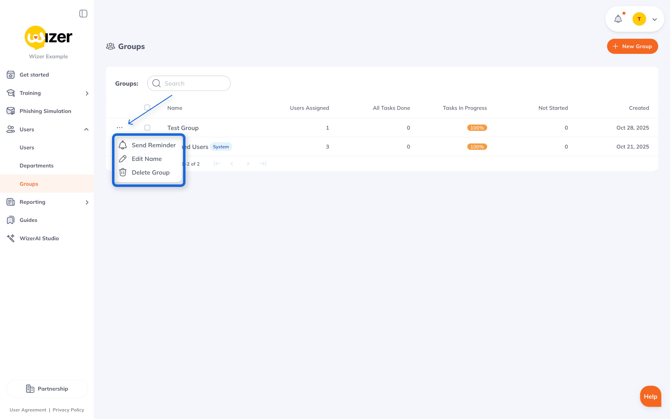
Group-Level Actions
From the main Groups list, you can manage the group itself by clicking the corresponding action icons on the right side of the entry. Available actions include:
-
Send reminders to all users within the group.
-
Edit the group's name.
-
Delete the group entirely.
User Management within Groups
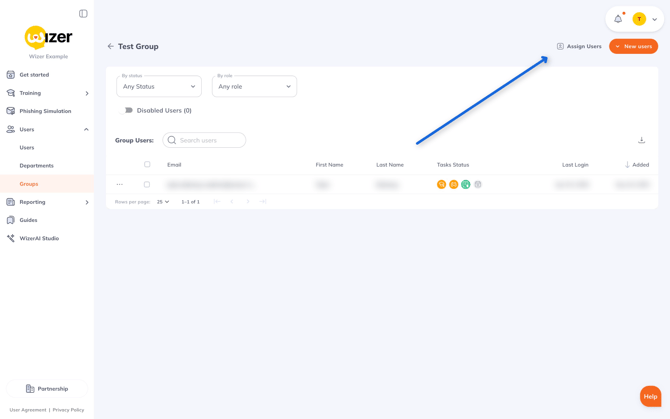
Assigning Users to a Group
-
From the Groups list, click on the specific group you want to modify.
-
Click the Assign Users button.
-
Check the boxes next to the desired users.
-
Click Assign to the Group.
💡 Bulk Uploads via API
If you need to upload or assign users to a group in bulk, you can do so using the Wizer API. You can find your API keys and documentation by navigating to Account Settings -> API & Integrations. If you need assistance with the setup, please reach out to our support team for help at support@wizer-training.com.
Managing Existing Group Members
Once users are assigned, they will populate in the group's internal list. By selecting the checkboxes beside individual user names, administrators can use the top-right action buttons to:
-
Send Reminders: Prompt selected users to complete pending tasks.
-
Remove from Group: Instantly unassign the user from that specific group.
-
Disable Account: Deactivate the selected user's profile on the platform.
Reporting and Exports
To view and export a detailed list of users assigned to any group, you can generate an Assigned Users Report.
-
Navigate to the specific group's page.
-
Click the Export CSV button located at the top right corner.
-
An automatic download will begin.
.png?width=670&height=419&name=Wizer%20User%20Management%20Interface%20Showing%20Test%20Group%20Users%20(1).png)
The resulting CSV report will include the following data fields for each assigned user:
-
User Name
-
Email Address
-
Department
-
Last Login Date
-
Date Added to the Platform
Need further assistance? > Please contact our Support team directly at support@wizer-training.com.