This article describes instructions that handle Step 2: Configuring the Directory sync for automatic user provisioning
Requirements:
-
Activated Azure SSO in the Wizer Admin Panel. Azure Provisioning won’t work without it.
-
SCIM bearer token. Generate a SCIM bearer token on the SSO Settings page.
-
Azure AD account with correct permissions to configure provisioning (e.g. Application Administrator, Cloud Application Administrator, or Global Administrator).
Instructions for SCIM application setup:
The SCIM application must be set up for Azure Provisioning (user synchronization) to work. Users will continue to use the SSO application to log in.
Instructions:
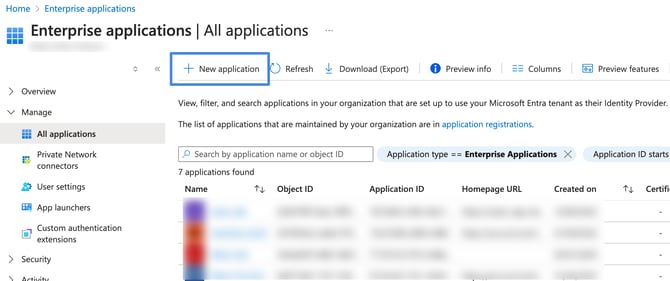
-
Log into the Azure Administration Dashboard https://portal.azure.com/
-
Click the Microsoft Entra ID button

-
Click the Enterprise applications Tab

-
Click the New application button
-
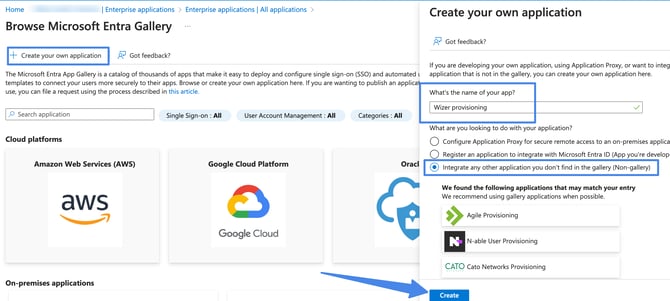
In the Microsoft Entra Gallery, click Create your Own Application
-
Enter application name (e.g. “Wizer Provisioning”)
-
Click Integrate any other application you don't find in the gallery option
-
Click Create
-
-
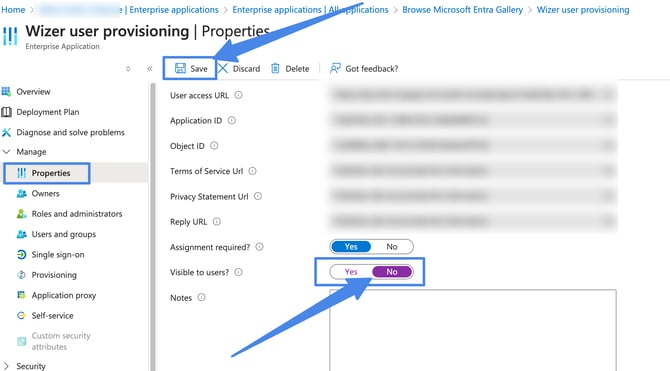
Click the Properties tab and turn off the visibility for users and then click Save
-
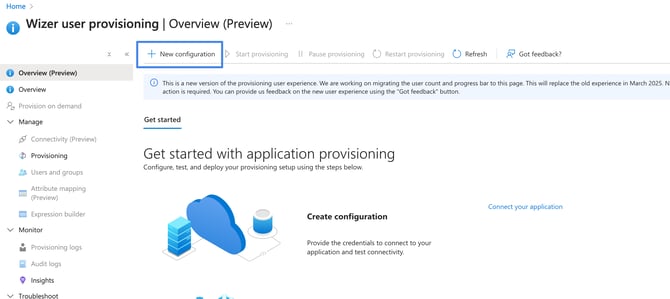
Click the Provisioning tab and then click the New configuration:
-
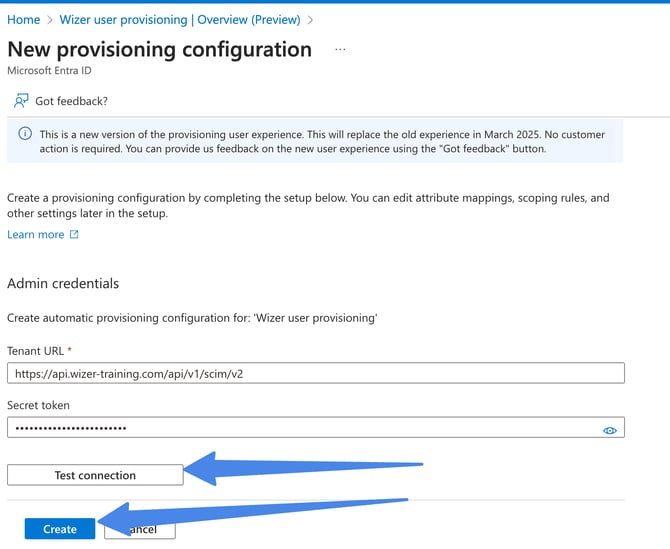
In the Provisioning tab enter the SCIM Base URL and SCIM Bearer Token
-
Select Automatic Provisioning Mode
-
For Tenant URL enter: https://api.wizer-training.com/api/v1/scim/v2
-
For Secret Token (SCIM bearer token) enter the value that was generated via the Wizer admin console
-
Click Test Connection
-
After you get notified that the supplied credentials are authorized, click Create
-
-
Define who will be in scope for provisioning
Only users that are in scope for provisioning will appear in Wizer.
The Azure AD provisioning service allows you to scope who will be provisioned based on assignment to the application (option A) or based on attributes of the user/group (option B).
We recommend provisioning users through assigning groups (option A).
Start small. Test with a small set of users and groups before rolling out to everyone.
- (option A) When the scope for provisioning is set to assigned users and groups, you can control this by assigning one or two users or groups to the app.
- (option B) When the scope is set to all users and groups, you can specify an attribute-based scoping filter (https://docs.microsoft.com/en-us/azure/active-directory/app-provisioning/define-conditional-rules-for-provisioning-user-accounts).
Assigning users and groups - option A (recommended)
If you choose to scope who will be provisioned to your app based on assignment, you can use the following steps to assign users and groups to the application
-
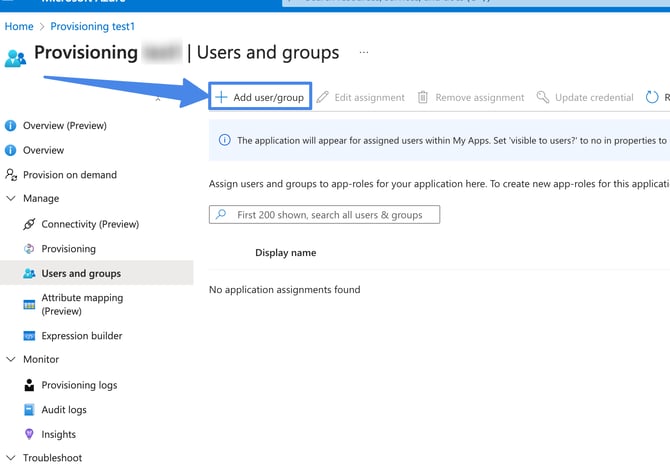
Click the Users and groups tab. Then click Add user button
-
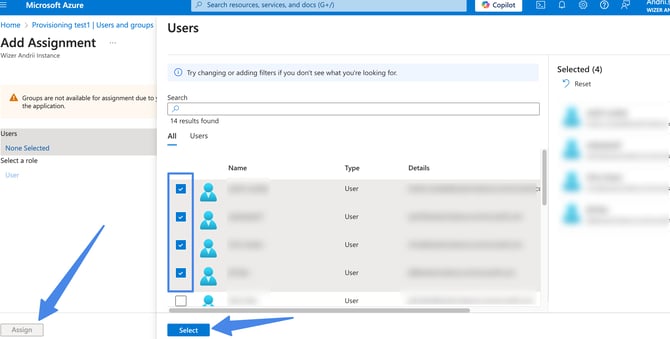
On the Add assignment screen, choose Users and groups tab, then select users and groups from the list. Then click the Assign button
Assignment to the application based on attributes of the user/group - option B
If you choose to scope who will be provisioned based solely on attributes of the user or group, you can use a scoping filter as described here (https://docs.microsoft.com/en-us/azure/active-directory/app-provisioning/define-conditional-rules-for-provisioning-user-accounts) (option B).
-
-
Select the Scope option in the Provisioning Settings section
- (recommended) Select Sync only assigned users and groups to only sync users and groups assigned in the Users and groups tab. But if you use attribute-based scoping filter (option B), you can select the Sync all users and groups option
Be careful with the “Sync all users and groups” option. If the attribute-based scoping filter is not configured correctly, it can synchronize all of your Directory users including your service accounts.Assign the same users and groups as for the SSO application. If some users are assigned to the SCIM application but aren’t assigned to the SSO application, they won’t be able to log in.- (Optional) In the Notification Email field, enter the email address of a person or group who should receive the provisioning error notifications and select the Send an email notification when a failure occurs check box.

-
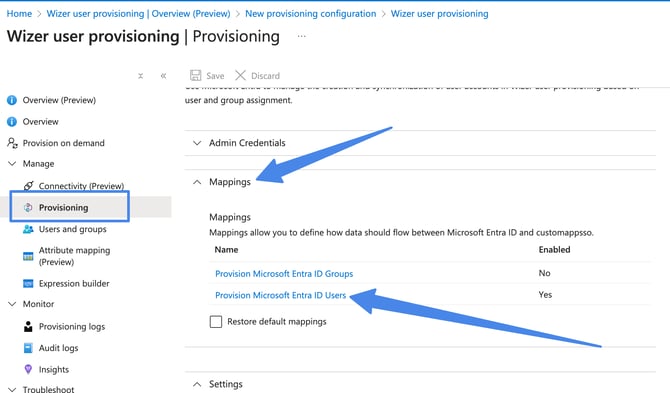
Open the Mappings panel and select Provision Microsoft Entra ID Users:
Here you need to adjust the below 3 attribute settings by pressing the edit button: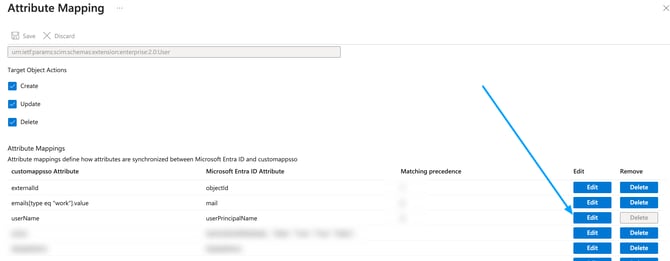
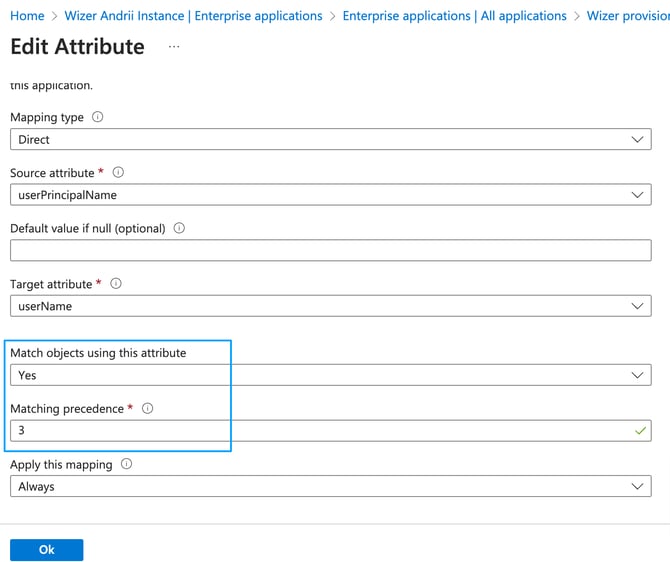
- Look for the userPrincipalName row and change the Matching precedence option to 3:
-
Look for the externalId row and press on edit.
While editing the attribute set the source attribute to objectId.
Change Match objects using this attribute option to Yes and set the matching precedence to 1 as shown in the screenshot below: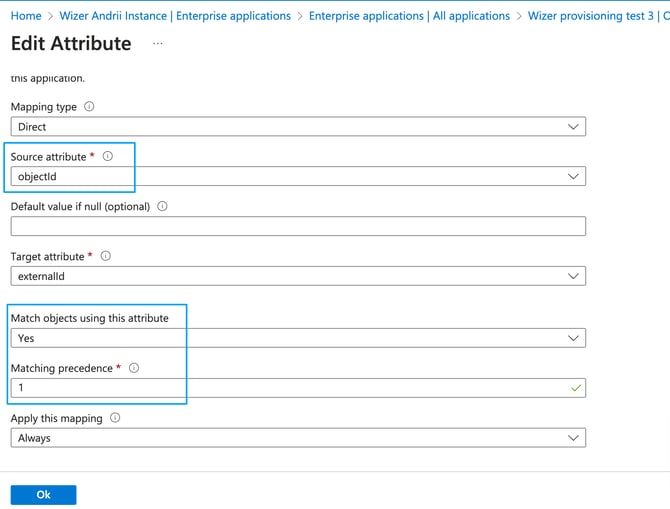
Save the settings afterward.
- Click the mail row. Change Match objects using this attribute option to Yes. The Matching precedence to 2:
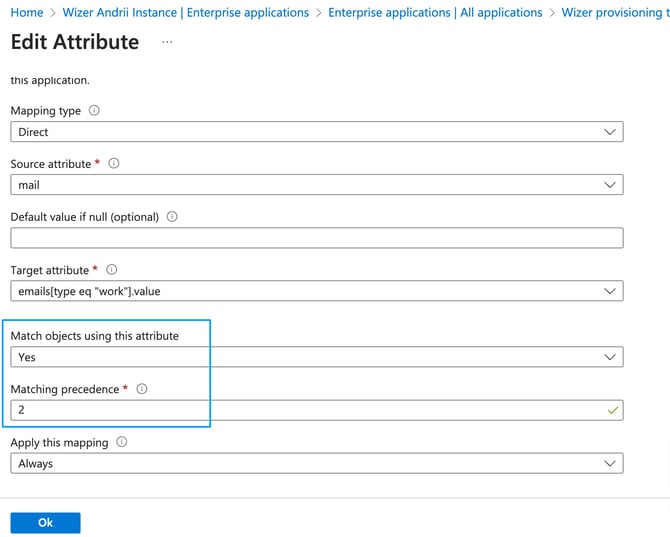
- Leave all the other fields unchanged. The result should look like this:

-
(recommended) If you don’t want to synchronize Azure Directory Groups with Wizer departments you can turn off Provision Azure Active Directory Groups
Click on Azure Directory Groups
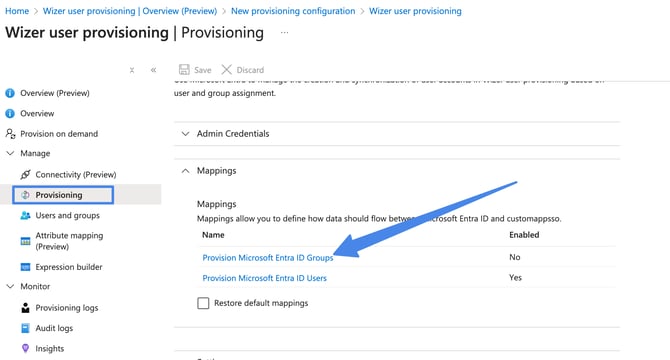
Turn off the Enabled option. Then click Save. This way Azure AD Groups won’t be created as Wizer Departments.
 For now, the Wizer application synchronizes only first name, last name, email, and department fields. But we plan to add support for other fields later, so it’s better to leave all the other attributes unchanged.Please note, per above the UPN (user principal name) synced only in case the mail field is empty. If the mail field is empty, upn will be synced as email in Wizer instead of the mail fieldIf you don’t want to synchronize user departments with Wizer departments you can turn it off by deleting the “department” field from mapping.
- Look for the userPrincipalName row and change the Matching precedence option to 3:
-
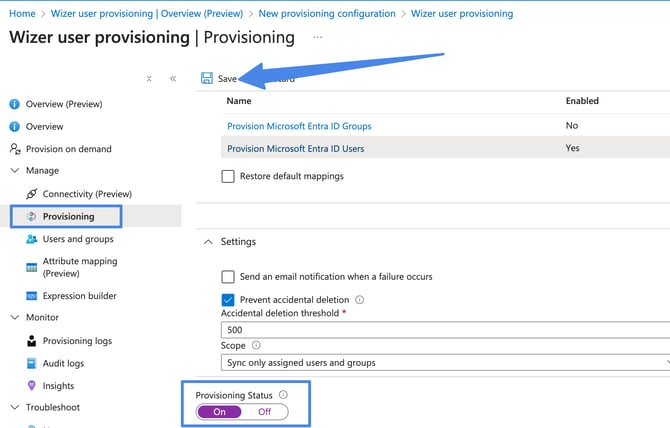
Click Save
-
Turn on Provisioning by selecting the On option in Provisioning Status Row and click Save
-
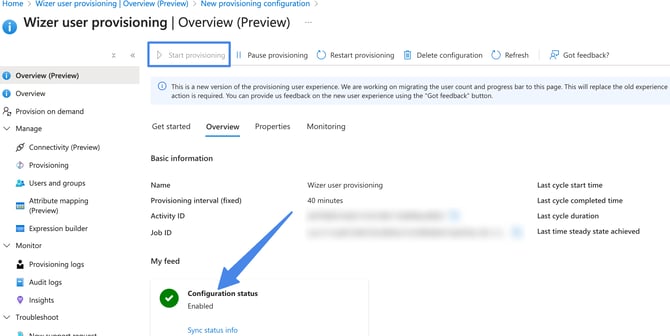
Provisioning should start immediately, but it might take some time before you start seeing users and groups in Wizer. The first initial sync might take a while depending on your directory size. Synchronization occurs every 40 minutes.
Alternatively, you can press on the start provisioning option, once the process runs you will see the configuration status as enabled:
-
If you experience any issues with provisioning - a user or group (department in Wizer) not showing up in Wizer, it's important to check the "Provisioning Logs" section for errors. If the sync process encounters an error it will stop and the user/group provisioning will not be successful.
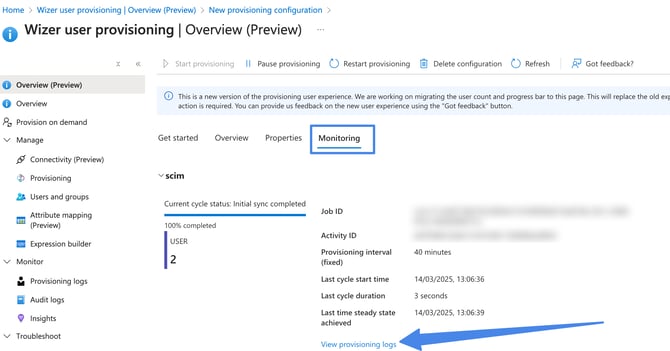
After the possible errors have been addressed, the provision should happen automatically in the next few hours, or you can restart the full synchronization manually by clicking Restart Provisioning.
Frequently Asked Questions & Answers
If an admin starts provisioning users via SCIM, what happens to the existing ones that are already enrolled (the emails and names are the same for both accounts)? Do they sync?If AD groups are synced as Wizer groups, user group assignments will be changed on the Wizer side (Will it be moved to a new group/department).
if AD groups are not synced with Wizer - nothing will change.

What if you do not have an option of adding groups in automatic provisioning?
If you want to manage groups on the SSO side, you can sync your Microsoft Entra (Azure AD) groups with Wizer Departments. This allows group management on the SSO side, and Wizer will reflect those changes automatically.
If you prefer to manage groups only within Wizer, changes will need to be made manually. We support bulk operations to assign multiple users to a group, but these must be done through the Wizer Admin Panel UI; CSV uploads are not supported.
- Create a new group with the same members, excluding those 4–5 users (recommended).
- Configure a user scope filter - this can help exclude specific users based on certain fields. However, this option requires more advanced Entra knowledge and might be harder to implement. Please check the article Microsoft Docs – Define conditional rules for provisioning user accounts.
Any questions? Please contact our support specialists at support@wizer-training.com